Showing posts with label home repair. Show all posts

Thursday, September 21, 2023

What's important

 Last Monday was pretty ordinary til about 5 pm  I went to work.  I stopped in to see my Mom.  I picked my daughter up at the mall from her job at 5  But right as she left work a heavy rain storm moved in.  Driving home became treacherous as roads began to flood.  I tried alternate roads with no success and finally got us safely home.  I was so thankful; I had  water was coming through the floor boards of  my car during the last part of our journey.  

When we got to the house we could see that our back yard was flooded.  Not just a few inches, but feet. The water was racing across the yard up the slope to our home.  Our street became a raging torrent. It did not even look like a road.  Cars began to stall out.  I called my wife who was at work in the next town over and told her to check in with me before she tried to come home from work.  In the middle of that conversation we lost our phone and internet. I was cooking supper also while all this was going on--food is always a priority! LOL  As I was making supper my daughter Elisabeth said she could hear things bumping in our cellar.  I went outside and opened the bulkhead (we don't have an inside access) and discovered the cellar was flooded to the second stair from the top.

We have a gas heater which was not on. And a gas hot water heater which had been on.  I have alarms down cellar if gas is escaping but those also were now underwater and unlikely to be functional.  I have no sense of smell so I would not know if gas was escaping.  I called the Fire Dept and explained. They said they would put me on the list.  I could hear sirens all over the city and I knew others were very likely worse off.  Supper was done, I had not used gas to cook it (thank you Instant Pot) We ate while we watched out the windows as the water roared like a river down our street.  I texted my wife that we were all ok but she should stay where she was.  

Hours passed.  Water crept higher.  I called the fire dept again and they said they would bump us to priority status.  A few minutes later I saw an engine up the street.  I ran up to them and explained.  They agreed to check our gas for us.  They used a meter and could not detect escaping gas.  However they also could not shut off my gas as the shut off and the meter are inside the cellar.  Evacuation was suggested but not made mandatory.  Truly I had nowhere to go with 3 animals, a disabled adult and my daughter and myself.  I suggested we shelter in place with doors and windows open.  The fire folks could not of course say that was great but there was no compelling proof that we would not be safe, particularly if we did not use any gas.

I slept rather little that night.  My wife called about midnight and said she heard a dam might break and that the water could potentially head to us.  I tried to sound super calm because she was hysterical. I said no one had come to talk about evacuation and that they surely would if that was immenent.  I fell back asleep but woke when flashing lights were outside.  Worried that this might be the evac order, I got up but it was a crew trying to get a submerged car out of the street.  I texted my boss that I would not be at the quarterly manager's meeting and gave a brief overview of what was transpiring.  I dozed some more til about 6 when I got up to try and survey the damage.

The water had receded.  There is a benefit to a clay floor in the cellar.  But the devastation it left behind was pretty massive.  I could not walk safely down there initially.  My wife arrived home and I said the first thing was to call for a dumpster because they were going to get rented out quick with all the damage sustained by folks in our city. The second call was to the plumber so we  could at least get hot water and order a new heating system.  The last call was to our insurance company. 

It turned out we were the first people to rent a dumpster. A 10 yarder was delivered early that morning and I called out of work and started filling it. Friends came over the next day and they helped continue that effort.  We got fans going in the cellar to help the floor dry but getting out everything that was wet was key.  By the end of the week I had moved out enough belongings to fill the dumpster 3 times. Wash rinse repeat.  On Saturday my friends came back and helped me move out the 2 fridges, the washer and the chest freezer that had been destroyed. The water was so strong it had tipped over the fridges and the washer!

I am looking at this as a great opportunity.  An expensive one to be sure as surprise! Homeowners insurance does not cover this.  One apparently needs flood insurance even if you don't live in a flood plain and have never had this happen in the more than 90 years that your family has lived in this same house. (I am not that old, I am the fourth generation to live here!)

I plan on repointing the foundation over the winter because hey, I like a project. Once that is done there are walls that I will insulate with rock wool and we can put in some new led lighting and make a decent workshop. My grandfather had put up paneling (which I have had to rip out) and instead I will use a plastic product that I used in part of our bathroom reno.  It is water and mildew resistant and a better choice for a basement/cellar area in my opinion.

Others had it so much worse.  Someone I know had a sink hole destroy the foundation of their home.  It is condemned.  Another person had their car swept away when the driveway gave way. No less than five people I know personally had cars flooded and totalled. My neighbors house is being worked on but was declared unlivable at this time. 3 families have had to find temporary housing as a result. I may eventually remember to post some pictures of right after the flood and after I cleaned it up.  We will see.  For now, I am simply hyper aware of our good fortune and that what is important is not things, it is family.


Saturday, January 7, 2023

Updating Old cabinets

 Months ago we installed new uppers in our kitchen.  We installed a set of custom lower cabinets in one area but there was a run of base cabinets that would have been too complicated to replace.  Made many years by vocational school students, the doors are thinner than normal.  They are essentially plywood.  But to remove them and put in a new base is more money and time than we wanted to devote to it.  So we mutually agreed to paint the lowers and put on new hardware to give them another lease on life.  


There used to be two very ugly faux drawer fronts underneath the sink.  They didn't fit properly and wobbled all around--in fairness all of my 5 kids pulled on them at one point or another when they were growing up.  But you can see the lovely orangey color and the dated hardware.  I had obviously removed the two faux drawers at this point--an embarrassingly easy thing to do that took about 3 minutes of time.  We also removed a piece of quarter round that was under the counter and discovered that there was a bit of a mess there.  Moisture had gotten behind the trim and mold was growing. There was a gap, caused in part by levelling the counter but also partly because there used to be a different counter and sink there in my childhood.  I did not want to put trim back there.  So I went to my source--Youtu*e  and sure enough someone had solved a similar problem with an old door.  

The solution was to put painters tape behind the gap and seal it thoroughly.  Then we used wood resin fill to fill the gap. The procedure was pretty easy.

Here it was after filling the gaps so that that top is flat.  We sanded it down with a mouse sander. My wife then took off all the old hardware and painted the drawers and lower cabinets.  Amazingly, for the first time ever, our new hardware lined up with the holes for the old hardware.  Truly a renovation miracle!  

Our plan was to replace the two faux drawers with one longer piece of wood.  I am a bit of  a wood hoarder.  Lumber is expensive and old wood is just so special.  One of the pieces i had saved from the bathroom gut job was a lovely pine board.  It was too thick for our purpose so a friend planed it to the correct thickness for us.  Today we painted and installed it.  The lowers look amazing!

The Youtu*er I watched called this process "puttin lipsick on a pig."  Well this pig looks pretty fine!  We used Heirloom Traditions paint for this.  I have used their paint in other applications in our home and find it to be exceptionally durable and very easy to apply.  This color is called London should anyone be interested in the color in their own home.

First project of 2023 finished!


Monday, September 26, 2022

A jolly bathroom!

 We are pretty much dancing toward the finish line for the bathroom project.  There are still things to do, but mostly they are of the fun cosmetic nature.  Like, building a barn door for the bathroom closet.  I have ALWAYS wanted to build a barn door. (OK I am willing to own the weirdness of that, but it is true!)  Also that project uses more reclaimed wood from another part of the house and I love that too. There is something special to me about using wood in new ways that has a history where you are. So let's look back at this delightful photo:

This wasn't even the very beginning.  This was after I got the old tub out, moved the plumbing and insulated the walls.  But it was at the very least 'rustic.'  Now I am focussing on things like this instead:


Saturday we installed subway tile and a jolly stick trim (side note: can someone tell me why the stick is jolly?) We wanted to cover the base which was formerly visible under the shower pan.  This ties nicely with the floor we put in and just makes for a clean, finished look.  

We won't have much time for reno in the next few weeks as vacation is getting veeeery close!  But really, this has been such a fun project and I have learned so much.

Saturday, August 13, 2022

Oh wait! It's ME?

 Since lockdown I've followed a bunch of You T*bers that teach home renovation skills.  I have about 4 favorites that are my go to sources when I am learning new skills.  And if you've meandered through this blog you will know that I have learned a lot.  Truthfully not JUST from the vids. I also have a talented friend who has shared his time showing me plumbing and electrical wiring.  But from the computer I learned how to demo, how to build and put up a new wall, how to modify cabinets, how to hang cabinets, how to do a back splash how to hang and repair drywall and more.


The other day when I tuned into one of my fave tubers he was doing a piece on using new found skills as a side hustle.  The premise is that by devoting the occasional Saturday one could now charge for doing these things for others and make some much needed cash.  He pointed out important things, like keeping the jobs you take on to ones that do not require a permit, registering your business etc.  And although I have little  no free time, I was still intrigued.  After all, I COULD have time in the future?  Maybe??  And i do love to do these kind of things.  Then the dude continues on, talking about not underpricing your skills. . . because there is a huge labor shortage and a lot of boomers are now in their 60's.  They don't want to be on ladders and doing these kind of things anymore.  They will pay good money he said.  Wait!  Stop the presses! Um,  I fall into that age demographic.

I don't mind being on a ladder.  I can carry drywall and subflooring.  I can do these things.  So if I can do them, can't a lot of other "boomers?"  I posited the question to my co workers who said that probably others didn't and it was just that I am an anomaly who does not feel or act my age.  I'm still trying to decide the veracity of that and whether or not it is a compliment.

Meanwhile I am going to go continue repairing and refinishing a table destined for my workplace!


Sunday, March 6, 2022

Tile Date


 Last Saturday my wife and I had an unexpected night where only she and I and Chet were home at night.  The two  youngers were at a sleep over event and I had proposed a date night to K.  She was on board and the plan was to see a movie we are both interested in.  However the sleep over event was over an hour away from our house so 2 plus hours were spent getting the kids there and chatting with friends and then driving home.  Truthfully it killed about 3 hours because I chat! By the time we got home, neither of us felt like sitting in a movie theater for another 2 hours.  Too.much.sitting!  So we decided to tile above the shower in our bathroom.

The rest of the bathroom will have crown molding at the top but in the shower enclosure I wanted tile over the green board all the way to the ceiling.  We also planned for an accent with blue and gray glass tiles.  They don't photograph particularly well but they are shades of blue and silvery gray.

So we broke out the ladder, our tile cutter and our wet saw and went to town.  By 11:30 we had finished two of the three walls. So we called our "date" and went to bed.  Sunday we got up at 6:30 and finished tiling the third wall and then my wife grouted it all.  It looks fabulous.   


We have another half wall to tile at some point but that should really be easier.  For one thing we won't be on a ladder!  It is the wall right next to the shower that the sink is on.  It will have the same pattern except that the bullnose will be at a half way point on the wall. The top part of the wall is painted a soft gray. Now to find the time to get it done.  We are so close to finishing this but schedules are so crazy.

My wife's business is very busy.  My work is busy (I typically work at the site one weekend evening weekly to keep abreast of things) The kids schedules are ramping up with a plethora of recital practices, work and school commitments. . . 

And while we are planning these things and shuttling kids, there are families in the Ukraine just trying to stay alive.  Sometimes I feel so hypocritical moaning about how I will fit in all I need to do.  I am not trying to just stay alive.  


Monday, February 7, 2022

It's a back splash baby!

 Figuring out the kitchen back splash was a very challenging part of our renovations.  Actually AGREEING on a back splash was a challenging part of the renovation.  We tried so many different styles out (buying just one 12 inch square) and could not agree.  Finally we did agree and bought the requisite squares needed.  

But things kept happening to delay the install.  My wife picked up a bunch of weekend shifts.  We needed to use a wet saw and had to learn how to use it and have it not be too crazy cold for using something with water.

I was set to order tile adhesive and found a new product called Musselbound that I researched and then decided to buy.  The order was slightly delayed.

We had to agree on grout.  Same challenge as agreeing on tile.

My wife got sick.

Just stuff.  However this past weekend was installation!  Actually my wife had a very rare Friday off and she put up the musselbound and the tiles that day.  Musselbound for those who may wonder is fabulous.  It holds tiles securely but lets you reposition until you push them down hard.  It is far less messy than traditional methods for those of us with less than superior troweling skills.  Saturday she grouted it--til we ran out of grout.  We were using a premixed grout from the big box store.  We went to the app and discovered there was none of left within 100 miles of us.  Amazon to the rescue.  Our order came in on Sunday, so while we waited . . .


We installed the FRP around our toilet.  Our toilet is fairly close to the closet wall in our bathroom.  I plan to install a small barn door on the closet and did not want to eat clearance space with tile.  So FRP to the rescue.  Basically this is waterproof, clean and neat looking and will also be used on the side wall by the washer. (in case someone spills bleach or detergent, I don't want damage to drywall.)  FRP is really inexpensive.  It has inside corner pieces and outside corner pieces and a top cap so the look is finished neatly.  You put it on with adhesive and use a heavy roller to make sure it is well adhesed to the wall.  It really looks great.  

Sunday the rest of the grout order came in and the grouting was completed on the kitchen back splash.


Doesn't it look finished and neat?


And here's the back splash.  Looking at it you would never know that we had to fill a niche and hang new drywall.  It also ties in with the Corian counter really well.  There are hints of copper in some of the tiles and I love that. My grandmother used to adore copper and had a lot of copper bottomed pans and copper accent pieces in the kitchen when I was a child.  This is a bit of a nod to that with our own spin on it.

There is tiling to do in the bathroom next. That will be subway tile so we will be using spacers for the first time.  I have a laser level which should also help.  We also have an accent tile and I want a bull nose tile on the very top. But it is not a lot of area to tile. Basically it is the sink wall and above the shower. However this weekend my wife has a shift to work so it probably won't happen til a week or so from now.  But there is definately progress being made.


Monday, October 18, 2021

We Light up My Life!

 So Saturday was not tile day.  It wound up being electrical day.  Here's the scene.  Our bathroom was ALWAYS under-lit.  We had an old dropped ceiling in there and the sole light came from a four foot flourescent light bulb.  ONE such bulb as it was an old fixture and the other light bulb would not work.  It was not the bulb, we had tried that.  Anyway, it was dim in there.  Dim enough that all my life I have had a clear shower curtain.  Not being I am an exhibitionist. Because I can't see well enough if the curtain is not clear.  So while my wife wanted a window and other things in this room, I wanted good lighting.  I researched and found that can-less recessed LED lights were a great option. I ordered a set of 4 that could be linked together.  I read up on lights like you wouldn't believe.  

I discovered that LED lights will use less energy.  They will be instant on.  And , dang, I can see in there!  I was able to set up the lights so that there is one right over the shower area.  I was able to set up two over the washer dryer area, and one that will cover the back side of the room where the toilet and closet will be.  Yes!  We'll be able to see in the closet too.  No more fishing around playing "where's that product!"
I learned a couple of things.  Wiring these was really easy.  I also learned that the GFI plug that was in our bathroom pre-reno was not wired correctly.  There was no ground.  It would not have done its intended safety function if needed.  We were not safe the way I thought I was.  And we paid an electrician for that.  That is fixed now.  And the GFI works downstream and will cover all the other electrical components in the room.  In the picture above, you will also see a black thing.  That little beauty is our new  exhaust fan.  It is so sweetly quiet I could not believe it was on.  I haven't installed the ducting yet.  (which will be an interesting thing) because I had to order the ducting kit from the Big Box store.  But soon that will be in and then I'll drop the light fixtures  for a bit and hang the drywall.


The lights work on a dimmer switch that can take them down to 10%  And they have another super feature.  Look at this last pic?  That is the night light feature.  That dims down too!  It is just totally cool.  


Saturday, October 16, 2021

Tiling deferred!

Most recently when I texted with my friend and all things construction guru E, he had said he would not be available this weekend.  So K and I planned to work on our kitchen backsplash.  We have filled the niche, hung the drywall, used outlet extenders for the first time, and agreed on a tile. (the latter being by far the hardest part of this endeavor thus far.  We bought about 5 samples and finally settled on this Jeffery Court tile from the big orange box store.  It has colors that really tie to the existing Corian, but has sparkles of bright copper that will be a lovely accent.
We also decided that we would like a pencil trim at the bottom.  I am not a fan of grout lines at the base of the counter and like the look of the pencil trim below.  However, we might have to wait a bit to find out how all this comes together.  E texted last night that he was available after all if I wanted to work together today.  Well of course I did!  And we did electrical!  There will be pictures, in another post but they truly don't do the job justice.  Part of that is because the lights are mounted in a temporary fashion until I am able to duct for the exhaust fan.  But this is fine with me.  

 As a bonus, the extra time allowed me to do yet more research on the tile job and I have found a product that is a sticky membrane called Musselbound and think that I would like to use that instead of mastic.  I ordered that and it will be in before next weekend.  Meanwhile if I have free time (something always in a short supply around here) we can start putting up drywall in the section of the bathroom that is over the shower stall. We have a bit more levelling to do of the base area for the shower pan. And we can finish off the bathroom closet.  It is coming along.  And wait till you see the lights!!!


Tuesday, September 14, 2021

New kitchen cabinets!

 I realized that I forgot to post up pictures of the new kitchen cabinets.  Say what??? I remember to take pictures of holes where the shower will drain and I forget our sexy new cabinets!


Well, behold!  Here they are, looking all shiny and gorgeous!  They are also 4 inches higher so you don't have to contort your hand under the cabinet in order to reach the outlets and the light switch.  The bridge cabinet has my serving bowls that I haul out for family holiday gatherings (and essentially never use at any other time)  The insides are frameless so it is easy to load and unload. And they are soft close which is my favorite feature of all.  I installed a under cabinet light under the bridge cabinet. It is rechargable with a usb cord and you wave it on and off with your hand.

There is green board that is going to get installed under the cabinets down to the base of the counter so that we can put up a tile back splash.  

There is a matching cabinet down in in the alley way of the kitchen.  It is the same height as the ones over the sink, so it is a nice sight line.  Underneath it we installed the coolest storage thing ever--a magnetic knife holder. So easy to grab my correct knife when I am cooking supper.  It's awesome.


So things are moving along and now you have a prettier pic to look at than the hole for my someday shower drain!


Monday, September 13, 2021

Build a wall and a shower will come!

 Saturday E came over to help with more bathroom tutoring.  While I had hoped for installation of the bathroom sink, he patiently explained why this was not next on the list.  It makes sense, but I was still a teensy bit sad.  However, he explained that when you do a big job like this you work from the top down.  We have framed our new ceiling all ready. But we still have to do that electrical and the new exhaust fan for the bathroom. We have a wall for the shower to build. We needed to finish a bit of plumbing repair to the work done for the toilet trap and we needed to reroute the electrical for the washer and dryer so that the aforementioned wall could be built.


So this was the first order of business after the trip to not one but two big box stores trying to get needed supplies.  We re routed the electrical for our washer and dryer and after the wall was built secured our electrical cables neatly and safely on a 2 x 4.

E is a great teacher and I have learned about grounds and the correct gauge for outlets vs switches and various other cool things.

These are 220 outlets though as they are dedicated to the machines.


This is the wall we built.  Now I realize that it is ia SMALL wall and not probably all that exciting to look at. But will you for the love of all that is holy just oooh and aaaah a bit here!   Why?  Becasue this wall represents the needed third wall which will support our shower!!!  We are getting closer friends!  As close as I wish we were?  Heck no, but doing things right, especially when you can only do it on weekends, is going to take time.  

This is the drain hole for where the shower pan will go.  There is no plumbing there yet but I would imagine that we will hook it up around the same time we do the sink.  There is stuff to do before we can install the shower.  My floor slopes significantly so I need to level it with concrete.  I need to then install my vapor barrier because the shower walls install direct to the studs.I need to put two plywood blocks on the new wall.  One will hold the shower temptrol. The other will hold the shower head and the handheld shower that attaches to it.


I also ordered the lights for the bathroom.  I am going with 4 recessed canless lights that have a dimmable feature down to 10% and a night light feature.  Both of those things sound cool but not as cool as the fact that we will have a light directly over the shower and for the first time in my life I will be able to see when I shave.  LOL


This coming Saturday we are going to go paint my mom's study for her so no bathroom work or very minimal bathroom work will occur.

Sunday, September 5, 2021

Kitchen wall face lift!

 Last weekend I took our kids on our final campout of this year.  We camped in Maine with friends from church and had a marvelous time.  My wife never comes on this jaunt. She proclaims it "too peopley" as there are more than 100 of us who gather there.  So she stays home and it is her time to use as she wishes.  This year, she decided to surprise me by painting the kitchen walls.  I present to you the before:


Essentially our entire kitchen was unpainted knotty pine, probably installed by my grandfather. There was one wall that had only horsehair plaster. We had enough reclaimed wood to put wood up there to blend in with the rest of the walls. It is not that I hate the walls. It is just dark.  And we have new white upper cabinets that we want to install next.


Now, the after!


The entire kitchen is painted this creamy french vanilla color.  The lighting is presently unchanged in the space so you can really tell how much brighter it makes things feel.  It was an amazing thing to come home too.  The two uppers that you see best in the first picture are the two cabinets we are replacing.  The niche area in between is going to be filled in.  A cabinet bridge 12 x 30 will go betwen the two uppers.  The uppers will also be about 4 inches higher as they are so close to the counter level that turning on the light switch and the disposal is awkward.  The remainder of the space between counter and what is left of the odd little niche will be greenboarded and tiled.  Tomorrow my wife and I both have the day off from work so we hope to work on the cabinet install.


Tuesday, August 24, 2021

Construction Updates!

 There is likely no one on the planet quite as excited about our renovations as I am.  Each little thing we accomplish is another skill learned, another honoring of the legacy of this home (as the 4th generation to live here there is a very real sense of responsibility to care take wisely for this home), and improved functionality for our space.  

I have definately been slacking in the blogging of this journey.  Weekends we were   working on the projects, and there were 4 days of camping which left me off line and relaxing in the mountains with friends.

But I present to  you the most recent efforts in our various projects:  I'll start with the least "sexy" things first:

Yes, that is a toilet flange on our new bathroom subfloor.  Why would I subject your tender eyes to this?  Well, remember functionality?  Part of making the bathroom function better was moving the toilet over to where the sink used to be and putting a small sink where the toilet once was.  This meant installing a new flange, replacing all our cast iron waste pipe with new PVC and other amazing feats of plumbing that took place in the crawl space.  It will make the walk space better in the bathroom so that you don't step out of the shower and knock a knee on the toilet.  And I learned cool new plumbing skills.  I will not lie. I was petrified to do this part of the renovation.  My friend assured me it was not that hard.  And except for cutting up the cast iron pipe and hauling from the cellar, it really wasn't.  I'll get to reinforce my flange skills in a few weeks as I have to pull the toilet again (we put the new toilet on right away so we had a downstairs bathroom) I'll need to put on a new flange after we lay the new floor in a couple of weeks.


Next non sexy pic?  I present the bathroom closet subfloor.  The whole room has a new subfloor actually, but this particular closet has always been so hard to use, so lacking in functionality, in any form of pleasing aesthetic, that honestly, seeing a smooth subfloor in there kind of rocks my world.

All right if you have oohed and ahhed over picture one and two you will really like this:


See that tall kitchen cabinet?  That was a stock 84 inch tall, 24 inch deep 18 inch wide cabinet.  Except that for our house, 24 inches deep stuckit out about half way across that built in that you can see in the picture.  The built in does not have deep shelves--it backs up to a chimney--and we had been trying to use it for storing baking spices--all the sweet things like extracts, and goodies for decorating cakes and such.  We made it work but it was not really great.  The shelves were narrow and things fell out tipped over and jostled easily.  

Where that tall cabinet is there used to be a smallish home made cabinet that we used for medical supplies.  We decided if we could yank that out and put a tall cabinet in the top part could be for meds (pain relievers, band aids, after bite and such ilk) and the bottom could have multiple shelves for my baking needs.  This would mean my russian decorating tips would not roll out at me any longer and I would be able to find my favorite sprinkles.  Alas, we measured the space as we wanted it to look as "built in" as possible.  The space would be 11 1/2 inches deep.  This meant either a custom cabinet or cutting one down.  Guess which one we did?  My wife rocked it and it really tucks into the space nicely.  It rests just behind the door casing to the built in.  I'll have to take another couple pictures of it as it has handles and I'd love for you to see how wonderfully it is filled and organized. I really can find things in a jiffy!


If  you look super close in the picture you will see that under the window there is no wood.  Most of the kitchen has knotty pine but for some reason that outer wall is just horsehair plaster.  We saved all the wood we removed from anywhere during this renovation and had enough scraps of knotty pine to piece in under both windows and behind the fridge.  Now we are washing the walls with TSP and then we will prime and paint --that same creamy french vanilla color.  I don't mind that the boards we reused have dings or nail holes from prior use.  I intentionally left them.  They are part of the history of the house, the generations that came before me and treasured these walls as much as we do.

Wednesday, June 23, 2021

Construction anyone?

 There is still lots to do, but we have also made some great strides!  Picture number 1 is one of our three new windows.  The windows were installed by a contractor friend but all the finish work was done by us.  We had to do some insulation work with spray foam and then we trimmed it out, made the reveal and the sill.  The large shelf is the top of what will be a built in book shelf.  I will be able to have a nice place to keep my cook books at some point in the future and the cats will have a lovely shelf where they can watch the birds outside and where Val can eat up off the floor so that Rocky does not bother her. There were a few things that excited us the most about doing this. First off, finish work is fun.  It's like putting on make up or decorating a cake.  It's the reward for all the sweat and heavy lifting that goes into the job before you get to that point. The other  thing that made this so cool was that our contractor friend intentionally left the finish work for us.  Not because he did not want to do it, but because he looked at the work we were doing and felt we were up to doing it.  He is really picky about how his jobs look so I honestly feel this was a very high compliment.


OK in  picture number two, aside from me apparently moving at the speed of light, you see that we have made another huge step forward. We have begun laying the subfloor in the bathroom.  It goes into the lower part of the kitchen, which meant that I also had to rip up the 7 layers of floor that were there. Yes, you read that right. 7. There were two old lino layers, an insulating layer of newspaper and 4 layers of tile and various subfloors.  My wife cut the flooring with our circular saw and then I pried it up so that we are down to the original boards.  This was important so that the subfloor could lay through the bathroom into the lower part of the kitchen. It was also important because we were trying to find (and did) a missing heating duct that I plan to repair and activate in the lower kitchen area under that pretty window. Lastly, it is important because we have ordered two new base cabinets for the kitchen and I want to have the subfloor done in that whole area before they are delivered.  Laying this section of the subfloor also lets us work on building the wall between the bathroom and the kitchen.  That wall will be what one wall of our shower rests on so it is beyond exciting.  
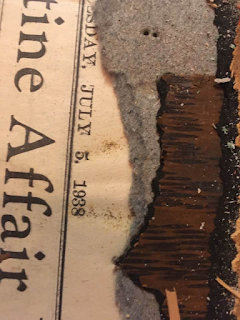
And this is what we found as the final layer when I was taking out the old floors and subfloors.  Newspapers, which my mother says my great grandfather put down as insulation back in the 30's. Specifically in July of 38.  It was kind of intriguing to me as in September of that same year there was a big hurricane here that took down all the trees on our property.

We have tons more to do. It is sometimes daunting how much remains yet to do.  It takes so much time, partly because I only have weekends.  My friend who helps with things I need to learn how to do (such as plumbing or electric) is not always available.  He too is doing a bathroom and also has lots of kids and things that take his time. I hope that this weekend we will make more strides but we also have to make a dump run to get rid of the debris we have accumulated from the last few weeks of work. We are having friends over for a BBQ on the fourth and I don't want anyone getting hurt on the construction detritus.

Tuesday, April 6, 2021

Chet makes a plan!

 This past weekend was Easter weekend so it was light duty in the home improvement arena.  I got a new medicine cabinet for the upstairs bathroom and installed that.  I picked up a new vanity for that same bathroom, so I can install that when the downstairs one is someday finished. LOL I did some picture hanging, pulled some nails, kind of  kept things low key.  

Chet found getting rid of the old medicine cabinet rather heart wrenching. I had him help me pull it out and we looked at all the rust all over it.  Honestly there was so much we had covered it with duct tape  years ago. It was put in when I was 4 and i am in my 6th decade; this owes us nothing!  It helps him to  be part of taking the old thing out and he calmed doing that.

Later he came and asked me what was behind the walls in his bedroom.  I asked if he meant did it have insulation and he said yes.  I explained that there is no insulation in those walls, actually in any of our bedrooms.  There is no heat upstairs either but we are all used to that.  Chet then asked if I could someday "rip his walls apart and put in insulation."  LOL  Well, yes, i could, once the other projects I have going are done.  It would really only be two walls so it would be pretty straight forward, though getting the debris out of the second floor will be a pain in the you know what.

More than that though I was concerned over how Chet would handle mess in his space. And there would be mess.  I explained that I only can work on the weekends and it would take about 4 weekends for me to get the job done. You have to understand that Chet essentially lives in his room. He comes down and socializes at meal times and for occasional short bits during the day. But by and large, the man l ikes to stay in his room.  And he doesn't like mess and he doesn't like change.

I said I was willing to do the job but it would probably be late summer or early fall.  And that he needed to think this through carefully.  He nodded and wandered off.  Two hours later he was back.  He said he had thought it over and he thought we should really do this because his room is cold and this would make it more comfortable.  He had decided that while I am working in the day time that he could hang out in Elisabeth's former bedroom and he had checked to make sure there was tv access there and a place for him to sit comfortably.  In short, he was a man with a plan!

I can't begin to express how impressed I am by this. I will check in with him again in the late summer to make sure he still feels the same way but as it stands now, I will be taking his two north facing walls down to studs insulating and hanging new drywall.


Sunday, March 14, 2021

Weekend Warrior Woman!

 This weekend I kicked it into high gear in the bathroom project.  I got almost all the wall demo done and also took up the old tile floor and the subflooring. 


This picture was courtesy of my wife, surprising me with a candid pic when I lease expected it.  But actually today what I wanted to write about was not what I was doing physically, but how I have worked to help this be tolerable for my son Chet. Chet has Aspergers.  He is very much a person who craves consistancy.  He has his evening shower (now bath) at the same time every night. He has a snack at the same time every day.  He takes the recycling out at the same time every day.  You get the gist of things.  The guy does.not.like.change.

And here we were planning the biggest change to our space that we have ever done.  I knew when we started this that I would have to use care to help Chet get through this.  Knock wood so far we have been melt down free.

I started explaining what we were thinking of doing way before we did it.  I explained that we talked to two companies and they could only do a portion of this work for between 10 and 13K  If we took this on ourselves and did it with minimal contractor input we would have a more functional, beautiful space when we were done and we would not probably pay 1/2 of those numbers in cost.  Chet is analytical so this helped.

I also took time every weekend to explain what I was going to focus on that day before I did it.  Even if I explained it the week before, I did it again.  I gave him 20 minutes to ask all the questions he wanted and then I would move him along so I could get working.  Chet will literally ask questions for hours if you don't put an end time on things.  He would check back in with me at snack time to see what I had done so far.  It helped keep the mystery out of thngs.  I have a pretty thick skin where Chet's concerned. I know that he does not mean to be hurtful.  His saying things like "what are you destroying now?" is not meant to hurt my feelings.  I just always explain that I am taking apart things that don't work for us so we can install things that do work for us.

For instance, I demoed a closet. I am going to build a new one there with better and more functional shelves and a sliding barn door that can have towel bars on it.  To Chet, the old closet was "perfectly fine" and i had to take the time to show him why it wasn't.  Explaining it calmly and quietly helped.

I had to alert him to noise.  I never start work before he has his breakfast and does his hygiene so tha the can get upstairs before I start banging.  If something is extra noisy like the tub removal, I warned him and I kept the bathroom door shut to try and minimize the sound. Chet is extremely sensitive to sound.

I have found ways that he can help.  I had him help me carry the pieces of the cast iron tub to our dumpster. I have had him hold doors open, or fetch tools.  Not a lot, just things here and there so he feels a part of the process. 

I have showed him the new components that I have purchased for installation. The new toilet has been vetted for energy efficiency. I showed him the insulation and explained why I bought this specific type of insulation instead of the fiberglass.  I showed him why having a new shower head with a detachable hand shower would be helpful.  He needed concrete examples which I had but it made it possible for him to feel we did not have to save our old showerhead.

In some ways, all of this is more exhausting than the labor of getting the bathroom down to studs. But he has stayed calm and that is really really huge. We are all looking forward to the completion of the job but if knowledge helps him deal with the inconveniences I am all for it.


Sunday, March 7, 2021

A Tale of A Tub

 The bathroom renovation (which is still basically demo at this point) has been progressing nicely.  It is not as fast as I would like--projects never are.  There are a number of factors that play into that. My construction guru friend has out of state jobs periodically and is unavailable to coach me.  But mostly the slow down is that I have tried to keep the bathroom functional as long as possible and I can only work on weekends as a general rule.  

By this weekend I had progressed to the area that gave me the most concern of all.  The Great Removal of the Tub.  As per usual I spent loads of time watching youtube vids on the best ways to remove a cast iron tub.  I should also note for the record that I am in my sixth decade and weigh about 130 pounds.  Also the bathroom area is very tight to work in.

I saw a cool method using an angle grinder but don't have one.  My friend E had a saw that he fitted with a blade for metal.  I gave that a try on Saturday.  It took quite a while for it to cut through the cast iron and it could only go down so far. It could not cut across the floor.   After many hours of do that I decided to move onto plan B which involved using a sledge hammer. (also borrowed from construction guru friend)  

However it was later in the day and clearly I did not think this through.  My idea was to bash the tub in the area where I had made the cut.  In my mind I thought that this would then eventually cause the tub to fracture sort of on the line of the cut I had made.  It did not work like that.  After 30 minutes of bashing with a gigantic sledge hammer I had, as my oldest son so kindly put it (a very small hole for all that work) Thankfully I refrained from bashing HIM and called it a day. LOL

That night while lying it bed it occured to me that I was approaching this bashing thing wrong.  I needed to bash the BOTTOM of the tub as near as possible to where the side cuts had been made. I got up early, had a quick breakfast and 20 minutes later:


I wound up bashing it into three sections.  One I could carry out myself.  One my wife helped with, and the last and largest one I carried out with Chet. Kirsty has a bad back and I was very worried she would injure herself. 


This is the area that used to have a tub!  Notice there are two doors on the back wall. They don't go anywhere these days but long ago they went to a shed and to a barn where the "three holer" was.  I am now in the process of removing the green board and getting down to the studs.  When my friend is free he will show me how to remove the doors and seal the space more effectively with insulation.  But it has been a good weekends work and i am proud of the progress.  Also, I found the bathroom floor under the tub to be in excellent condition so that is a plus as well!


Saturday, January 30, 2021

Plaster and lathing begone!


This attractive photo is one wall of what I spent this morning demolishing as we move forward in the renovation of the downstairs bathroom.  The green stuff is horsehair plaster.   The horizontal boards just below it are the lathing.  I am removing the plaster and lathing, because as you see in the picture. . . there is NO insulation.  Not a speck and that is not because I removed it. It is because it simply does not exist.  By the way, this bathroom is on the north side of the house in a New England state.  Yup, it has always been a very cold room.  The hardest thing I do every morning is get dressed in it at 5:30 or 6:00 a.m. in this freeze box.  room.  I had to do all of these two walls with extreme caution as what you can't see in the picture is that the toilet is on that wall.  My goal is to keep the room functional (albeit increasingly um, rustic looking?) for as long as possible.  So removing the lathing and plaster is more tedious because I have to be careful that things don't crash down and break the toilet or something awful like that.

I also took down the plaster and lathing in the closet next to the toilet.  That is the area with the weird faux pine boards that conceal--you guessed it--more horsehair plaster and lathing.  I took all the shelves out so that I could get this down to studs.  Except for a tiny section that I will be able to reach if I climb on the laundry stack this entire wall is done.  I didn't perch there today as it was also laundry day and the machines were in use. The idea of sitting up there while they rumbled beneath me was not something I wanted to pursue.

Essentially all the destruction happened between 9 a.m. and 1 p.m.  Then from then on I had to get all the debris out of the room and stored outside.  I will call a removal company next week and see how many millions of dollars they charge to cart it away.  Normally I would bring in a dumpster but it is winter.  We have 3 cars and one shortish driveway.  If it snows I can not park on the street due to a parking ban and a Nor-easter is expected next week.  So I am instead calling one of those companies that tells you to snap your fingers and your mess is gone.  We shall see.

Going down to stud also exposed some brick on our chimney that runs through this room which need repair. I will explore that tomorrow.  For now the room is clean and  usable.  I put a temporary shelf in the closet so that we can store beauty supplies there for now. 

And we have more to learn about.  My wife cleans for a family a few towns away. The woman also did a bathroom renovation, largely on her own.  Truthfully I think it was her efforts that inspired K to go all in on this project as she is often somewhat more tentative than I am about this type of thing.  S told her that if we were taking the room to studs that we should consider installing a small mat of radiant heating (by say the shower and toilet area) to just warm the floor.  So now I need to youtube and learn about this.  I have learned so far that it is not cost prohibitive either to install or to run. Those are plusses. I have yet to watch the whole video though so I am not sure how complicated such a process would be.  Stay tuned!


Saturday, January 23, 2021

Holy New Bathroom Batman!

 We have the tiniest bathroom on record in our home.  To be clear, the house was built before indoor plumbing.  Both bathrooms are add ons. The downstairs one was a converted walkway that used to lead to a long gone barn where the "3 holer" was located prior to this indoor luxury.  The upstairs one was what used to be the "servants quarters" back in the day.  It has slanted ceilings and so can not have a shower but does have a tub.

In the teeny downstairs bathroom--the primary bathroom for our family of 6+ you can sit on the commode, wash your hands at the sink AND load or unload the washer without ever leaving your seat.  It is truly that small. When we were preparing to enlarge our family K and I took out a closet opposite the toilet so that a stack washer/dryer could be installed. Prior to that we had to go outside to access our cellar and the washer and dryer were down there.  Convenient as it might be to multi task, (LOL) this configuration also means you have to pull the toilet if you have to remove washer or dryer for repairs.  This makes an all ready expensive situation even pricier.

The tub is an original cast iron tub that my grandparents put in.  It has seen better days. We refinished it about 15 years ago and that is now in less than glorious shape.  We looked into having a company come in and put in a new shower and remove the tub.  The prices were stratospheric.  We talked it over and decided (drum roll please) that this was a job we would work on ourselves.  Yes we are that foolish  brave!  We also have a really construction savvy friend who is willing to guide me and teach me some valuable skills along the way.  

He came over and looked at what we wanted to do and helped us dream it even bigger.  It's kind of like Vegas , right?  We are all in for New Bathroom 2021!  The new and improved bathroom will have the tub removed.  We will take the stack washer and dryer and they will be placed side by side on cabinets I will build so that my wife does not have to bend so low to get things in and out.  We will swap where the toilet and the sink are to allow for better privacy and better walk patterns in the room.  The remaining closet I will build a rolling barn door (it previously had a bifold which always came off the track) This will be a solid door so it will allow for extra towel bars--something always in short supply here.

Obviously this large project became HUGE.  There is wiring and plumbing that will be relocated. We will pull permits.  I'll do the work with my friend and then it can get inspected. But it will be so much more functional. Oh and a new floor too!  I want to lay a waterproof vinyl planking because I would like to do this in our living room and figure learning on a smaller room is a good idea!  Our living room square footage is pretty high and the layout is not square.

So last week I started demo.  I actually love to demo.  There is something fun about it.  It is sort of like a puzzle because I have to figure out what to take out in which order to best accomplish the job.  In the bathroom demo is further complicated by the fact that I am keeping the room functional as long as possible. So it means working carefully in very tight quarters.  Between last weekend and today I have accomplished a lot of the demo.  We are bumping out the wall to the bathroom about 8 inches into a kind of useless area in our kitchen.  I have that wall down, and all the old tile off the walls and lots of weird drywall removed.  People just kind of covered things up over the years.  Probably because it is so darn hard to do a renovation like this when you are using the space!  I get it.  I love uncovering bits of the house's history.  Wall paper that my grandparents used.  The original outside door of the house.  And a bunch of other little oddities.  When I get everything down to the studs we are going to insulate.  

There is presently virtually NO insulation in the bathroom and we live in New England. It is cold.  The bathroom is drafty enough that although it has no window and we never turn on the vent fan we also do not have any mildew or moisture issue.  It is seriously that drafty.  We'll be using that fan after I finish insulating and putting up new cement and green board though.  Right now the entry way that K and I did this summer is draft free and warmer than our bathroom. That is just weird.

Today I had to spend about an hour on top of our washer dryer pulling out a faux wall that was behind there. I would pass the stuff I pulled off down to my wife who ferried it outside to the ever growing pile of construction detritus. I want to get it hauled away but I want to wait as some of the lumber is good and can be re-used when we frame in the new wall.

This is a good project for me. It gives me a chance to learn new skills which I love. It gives me a chance to research things--youtube is my greatest construction advice forum! And it keeps me busy.  Covid is still requiring that we not be in the world more than we have to and this feathering of our nest is just the ticket!


Monday, November 23, 2020

If you give a mouse a hammer. .

 I've definately been slacking on blogging lately!  Things have been busy.   But renovations have continued!  The front door was stripped and painted and all new hardware and locking mechanisms installed.  Stripping off the old paint was NOT for the faint of heart.  The stripper we bought was supposedly going to take everything off in one giant peel.  Um. no.  So we had to buy another stripped and used that, but eventually we got down to bare wood and were able to paint the door.


Hot on the heels of this front door masterpiece we moved to our back door.  Our previous back door was a hollow core door.  Not the best option for dealing with cold New England winters.  We removed the old door, took out the old casings and installed this new insulated door.  It has also since been painted red.  I love red doors because I feel they are so welcoming!  After that, we replaced the back exterior storm door.  By that time we had it down to a 90 minute install.  This door led to a very tiny back hallway.  Literally the space is 16 square feet.  It had dark dingy panelling and was not a well functioning space.  We took down all the old panelling and installed white beadboard.  We found lots of air leaks and sealed those up with foam insulation.  We caulked.  We removed the old yucky suspended ceiling and scraped and painted the original ceiling which looks much nicer.  Because the house was originally attached to a walkway to a barn there were multiple door casings that had been built out over the years.  We removed those that were either not appealing to look at and/or unnecessary.  I did save some lovely woodwork that I know my grandfather must have made.  I sanded it with my orbital sander and reinstalled that in two areas. 

Then I decided that the entry floor looked ugly.  So I took up the VCT tiles, scraped off all the old adhesive and laid a new floor.  I'd like to say that was quick--it is only 16 square feet, but it took me far longer than it should have.  I have a hard time visualizing how to cut around mouldings and I had some wonky cuts to make.  Eventually it was laid though.  I am awaiting the order of the floor trim that will go all around it and seam it in visually to the other spaces.  It should be in  by the end of next week and that is a quick install.


Isn't it bright?  It is also so much warmer in a space that was previously VERY drafty!  We are loving it.  Now I am starting to purchase the little decor items that we will deck it out with.


After I did that, I decided that the recycling closet which is located in this little space needed to be spiffed up.  After all, the outside of it all ready had gotten a face lift because we had removed the door and covered it with bead board and put on new hardware.  The hardware was reminiscent of what was originally there but more functional. (we need a latch that keeps the dog out of the recycling!)


I wanted to keep the feeling of the original work my grandfather had done making this closet and i think we stayed true to that.  That is also his woodwork that I restored around the door.  But inside, the closet was UGLY.  It had a tiny lino covered floor that was old (as in older than me and I am not young!) and it was dirty and dingy.  I took everything out, re-did the walls inside, laid a very tiny floor with left over tiles and put in a shelf and a hanging basket.

So much more functional!  So clean and organized!  LOL


The last thing I did was to replace our bathroom door.  That door was an old hollow core door with a thin veneer over it.  Years of hard use had caused the veneer to be peeling.  You could not hang a hook on the door for a towel or change of clothes because the door was hollow.  We are a family of 6. We need things like hooks.  The bathroom is also small and there is not a lot of hanging space for the myriad of necessities.  

 This is the bathroom door right after we hung it.  This was a pain.  The door size is not standard. Ordering custom would have meant at least a 2 month wait. (and I feel that was optimistic in these times of Covid.  I ordered a freezer in early May and delivery has been postponed three times all ready. We are now looking hopefully at an early December delivery.  But I digress. . . To avoid the delay of a custom order we ordered the smallest door we could and had a friend rip 1/2 inch off the door.  We could trim the casings ourselves but as yet we still only have hand tools, though I really want a small table saw! This is the door before it was painted.  You can glimpse it painted in the picture of the entry floor because the bathroom is literally right off that entry.  I still have to figure out what to do about the open space between door and tile.  It is not wide enough to really effectively put tile there, though I did salvage some and might try to see if I can make that work.  But thus far, I have not really moved into that space yet so I am just beginning to explore and see what will look best.

It has been fun working around the house.  Doing projects like this on an old house allow me to explore its history.  I am the fourth generation to live in this house.  When I did things like removed the paneling and found this garish asian themed wall paper it was fun to text my mom and ask her the story behind it.  When I removed a casing to install beadboard and found square nails, that was pretty cool as well.  

I don't do well with lots of down time, and I am very much an extrovert. So staying safe in Covid has been emotionally taxing and taking on these projects has been a productive and healthy way to stay sane.  Our space is improved both in the way it looks and in functionality.  I learn new skills and i have things to occupy weekends that used to be filled with gatherings, festivals, field trips and such.  I know we have done other projects too that I forgot to post but this catches up the biggest of those I missed!


Friday, October 2, 2020

Sprucing up the closet


I keep looking for projects and keep finding them!  This was from a couple weekends ago.  The first picture on the right shows an odd, less than functional kitchen closet.  Apparently many years ago, my grandfather built this closet, sealing off the interior access to our cellar in the process.  My grandmother needed a place to store her Christmas decorations and that literally was the sole purpose of this closet for my whole childhood.  Now in full disclaimer, it did not look as ugly as it does in the first photo on the left.  My grandfather had put up a wall paper that was supposed to look like knotty pine and had a dark brown lino on the floor.  Did that make it better than the picture on the left?  Only marginally.  The closet just did  not work for us.  It was where we wanted to keep cleaning things.  Brooms, cleaning cloths and vacuums, our rug cleaning machine etc.  But it was so dark and hard to see in there.  

So we ripped off the wallpaper, pulled up the lino, admired the newspapers from 1957 that he lined the floor with before putting down the linoleum. and made a plan.  We repaired the sheetrock where needed and put up a faux beadboard.  It is white and truly made such a difference.  We put a quick self stick tile floor in and hung new shelves (which you can't see from this picture) up high for odd things that typically live in this closet.  (it is the place where all our odd vases usually are stored but they were higgly piggly all over the place before.  


I put up peg board squares so we could  hang our cleaning tools and not have them falling all over the place.  I put in a new threshold and then we caulked and trimmed it all out.  It was a tedious job but not really super hard.  And the end result has been a huge improvement in the functionality of the space.


From there we moved on to stripping and sanding our front door but that is a story for another post!